- Set up a development environment:
- A smart contract is written in the Solidity programming language
- Development environment using tools like Truffle or Remix IDE
- Node.js installed on your machine
- Web3.js library
- The Ontology RPC URL and port provided by GetBlock
Create a Smart Contract :
An example:point_down:![]()
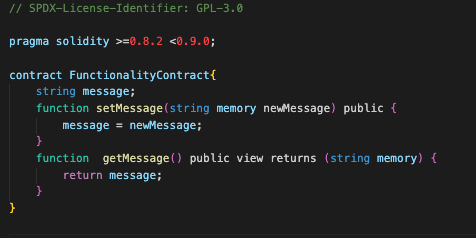
Create a new Solidity file for your smart contract. You can save this file with a “.sol” extension, e.g., MyContract.sol. Write your smart contract code in this file.
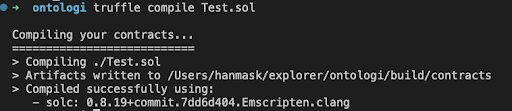
Compile your smart contract using the command: “truffle compile”.
You will have two files: bytecode (.bin) and ABI (.abi).
The bytecode is the compiled version used for the Ontology blockchain, while the ABI describes the contract’s functions and variables needed for interaction.
Connect to the Ontology RPC node provider using Web3.js To connect to the Ontology RPC node provider using Web3.js, you can use the following code:![]()
![]() Replace with the RPC URL provided by GetBlock.
Replace with the RPC URL provided by GetBlock.
![]()
To deploy a smart contract using web3.js: Import ABI and bytecode files, create a Contract object with ABI, create a transaction object with bytecode, and deploy with send(). Print the contract’s address on the console after deployment. Here’s an example code![]()
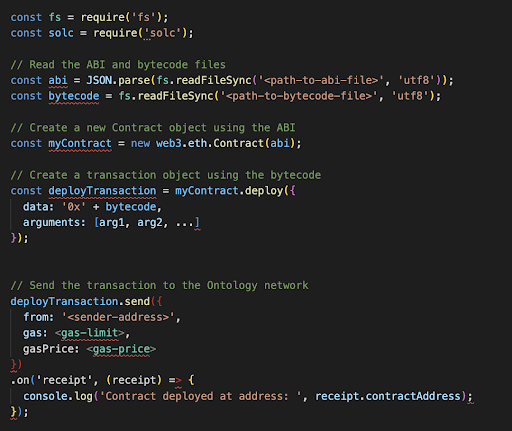
![]() Replace and with the respective file paths generated in step
Replace and with the respective file paths generated in step ![]() . Also, replace , , and with the relevant details for the contract deployment.
. Also, replace , , and with the relevant details for the contract deployment.
Congratulations, you’re now officially part of the smart contract club! ![]() With your success in deploying your contract on Ontology using GetBlock RPC node provider, you’re well on your way to creating something truly extraordinary!
With your success in deploying your contract on Ontology using GetBlock RPC node provider, you’re well on your way to creating something truly extraordinary!![]()